Beginner’s Guide to HPCs
What’s the Use Case
So I’ve always been interested in building out new tools, and the unique opportunity came along which allowed me to start building a computing platform for our internal team. Basically, the use case was we had a lot of GPU hardware and wanted a platform in which data scientists could deploy jobs without having to deal with stuff like linux commands, job scheduling, or any deployments related work in general.
The workflow was therefore simple: Users develop their models locally, and use simple tools to deploy their jobs without worrying about the deployment process.
What Were You Looking For
To be honest, even now I’m still learning on best practices and technology to deploy models. I knew cloud was out of the question because of costs, and for simple training jobs it would just be easier to work with on-premise hardware.
So the job was to find a technology which would do the following:
- Schedule jobs across multiple compute hardware
- Manage logging, services, security
- Easy to setup as more hardware comes online
So naturally, I started looking into HPCs
What is an HPC
HPC (High Performance Computing) Platforms allows aggregating multiple compute nodes that your compute intensive job can utilize. If you were trying to train the next ChatGPT or 3D visualization model or whatever you would need something more powerful than your single GPU desktop. HPCs allow you to utilize a large cluster of compute hardware to run compute intensive tasks.
What did you go with?
There’s a lot of stuff out there, from cloud services like Azure Arc to workload managers like Torque, but the one I found to have the least barrier of entry (and seemed very popular in the academic world) was SLURM.
SLURM
SLURM (Simple Linux Utility for Resource Management) is an open-source, scalable job scheduler designed for high-performance computing (HPC) clusters. It manages the allocation of compute resources, queuing of jobs, and scheduling of tasks on a cluster.
SLURM is widely used in research institutions, universities, and large organizations that run workloads requiring powerful computing resources.
Architecture
SLURM’s architecture is pretty simple, you have a single (or multiple depending on your needs) control node and multiple compute nodes. The filesystem the nodes will share to run your project.
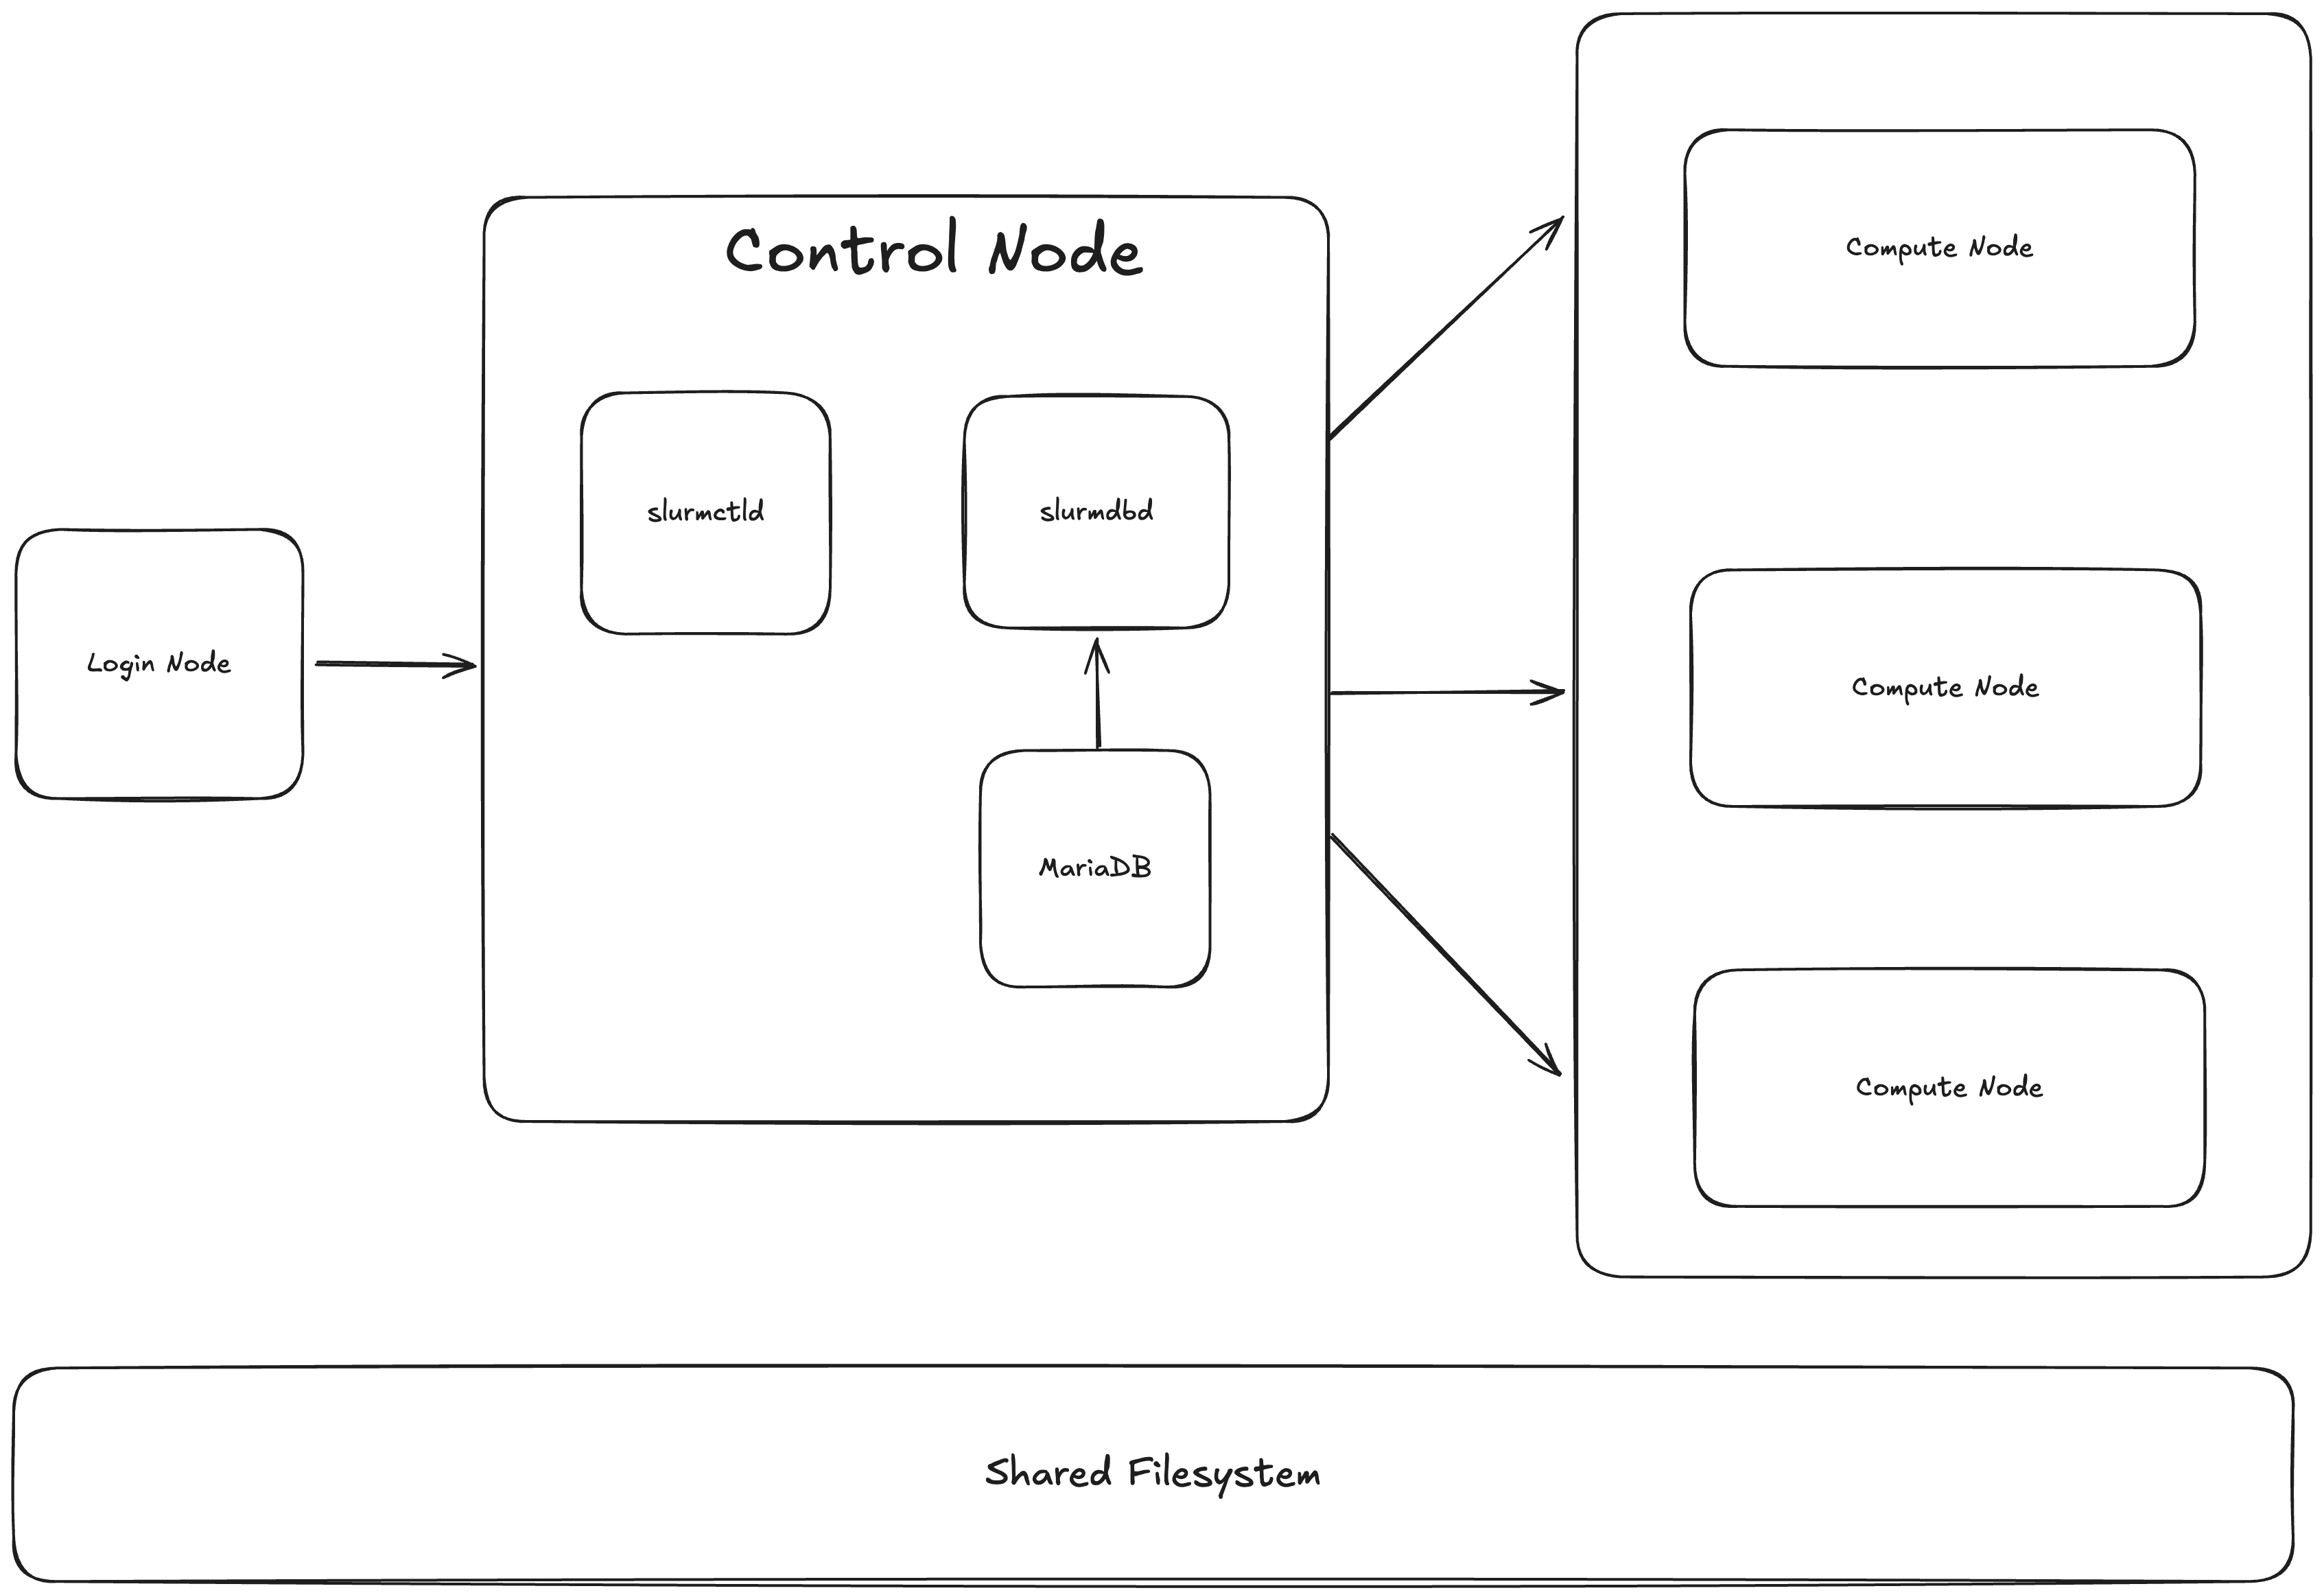
- Control Node
The control node is the heart of the SLURM system, running the SLURM Controller (slurmctld). This daemon manages the entire cluster, including job scheduling, resource allocation, and communication with other nodes. The control node also communicates with the database (if configured with slurmdbd) to track job history and resource usage.
- Compute Node
These are the nodes that perform the actual computation. SLURM runs the SLURM Daemon (slurmd) on each compute node, which accepts jobs from the control node, allocates resources, and executes the assigned tasks.
- Database
If SLURM accounting is enabled, the slurmdbd service records job history, resource usage, and other statistics in a database. This is used for tracking, reporting, and job accounting. slurmdbd interacts with databases like MariaDB or MySQL.
- Login Nodes
These nodes allow users to interact with the SLURM system by submitting jobs, monitoring job status, and performing administrative tasks. You can also just have tools such as UIs or CLIs depending on how you want users to interact with the cluster
How It Works
SLURM allocates resources by defining partitions, which are logical groupings of compute nodes. Users submit jobs to these partitions, and SLURM schedules and dispatches the jobs according to priority, availability, and configured policies.
- Job Submission: A job submission script specifies the resources (e.g., CPUs, memory, GPUs) required, the executable command, and the partition.
- Job Scheduling: SLURM’s scheduler evaluates job requests based on priority and resource availability. Jobs are either dispatched immediately or placed in a queue.
- Job Execution: The job is dispatched to the appropriate compute node(s), where it is executed, and results are stored or returned as needed.
- Job Completion: Once the job is complete, SLURM releases the resources and records the job's statistics.
Building SLURM
References
https://slurm.schedmd.com/quickstart_admin.html#build_install
https://www.schedmd.com/download-slurm/
Prerequisites
SLURM is built on Linux based nodes, so familiarity in working with Linux and its commands is a must. Most of the commands and steps here involve installing deb or rpm packages, setting up systemd daemons, file system management, etc. Knowing how to use command line tools is also needed here.
It’s also going to be important to understand filesystems and utilizing a NFS server.
Later on, we will be going over utilizing the SLURM API, so being familiar with REST APIs and token management will be useful.
Install Packages
SLURM packages are versioned by year.month of release. So for example, I am using a stable build 23.11.10, which was built Nov, 2023. Feel free to choose newer builds but for the sake of this setup your version needs to be at least newer than that.
Hardware Requirements
To install SLURM, you need to have at least the following available
- One Linux machine to act as the control node
- One or more Linux machines to act as the compute node(s)
- A open network connection between the control node and the compute nodes
- A database server to store account information about the cluster (optionally, if your control node has a large amount of disk space you can use the control node as the db)
- NFS or some shared filesystem to share data between the nodes
- SSH needs to be available for all nodes for access
- Root Access should be available to run sudo commands on all nodes
In terms of OS, it doesn’t matter as long as it can build either RPMs or Debian packages. There is an option to build manually from source but I find that to be outside the scope of this blog. The documentation to build from source can be found in this link https://slurm.schedmd.com/quickstart_admin.html#manual_build
This time though, we’re going to be setting up our cluster using Ubuntu 22.04.
Note: 22.04 will be best for installing packages straight from the deb builds (which we will be showing here). However, if you would just like to use FreeBSD package (slurm-wlm), I would suggest using 24.04 so that it downloads the latest stable SLURM build.
Setup the Control Node
Prerequisites
Before we install the binaries, we need to install some prerequisites. These include development tools, Munge, and MySQL/MariaDB (for the slurmdbd)
There is a full list of optional + recommended prerequisites here: https://slurm.schedmd.com/quickstart_admin.html#prereqs
Some of the basic ones we’re going to install include:
- MariaDB
- jwt (for JWT Token Auth)
- MUNGE
Building
- Sync the UID/GID
1# Create the slurm user/group for the control node
2sudo su
3groupadd -g 1005 slurm && useradd -m -u 1005 -g slurm slurm
This will create the user slurm:slurm with the UID/GID of 1005 (can be any UID/GID). It is important for all nodes to have the same UID/GID for the slurm user.
This user will have the necessary permissions to run any slurm daemon such as slurmctld or slurmd.
- Hostname configuration via /etc/hosts
Next, let’s make sure all nodes are able to communicate with each other. In Linux systems nodes have a /etc/hosts file which lets it know about other nodes it can communicate with.
Here’s what the control node would look like.
# Localhost
127.0.0.1   localhost

# SLURM COMPUTE NODE
NODE_IP     NODE_NAME
This tells the node “Hey, here is a computer called NODE_NAME under IP of NODE_IP”. So when slurm calls the node via NODE_NAME we don’t get a Hostname not found error.
This will be very important when we are entering in the slurm configuration file.
For example, a control node with 2 compute nodes would have a /etc/hosts file like this:
# Localhost
127.0.0.1   localhost

# SLURM COMPUTE NODE
NODE_IP     NODE_NAME
NODE_IP1    NODE_NAME1
NODE_IP2    NODE_NAME2
- Update package manager and install tooling
1sudo apt update && sudo apt upgrade
- SSH should already be setup for all the nodes, but if not, install the openssh server and client
1sudo apt install openssh-server openssh-client
- Setup Munge
Munge is an authentication service for validating credentials within a group of local or remote processes. Nodes share a cryptographic MUNGE key and allows authentication of a UID and GID.
 1sudo apt install munge libmunge2 libmunge-dev
 2
 3# test installation - should show STATUS: SUCCESS
 4munge -n | unmunge | grep STATUS
 5
 6# If you can't cat the munge key at /etc/munge/munge.key, create one using this command
 7sudo /usr/sbin/mungekey
 8
 9# Setup the correct permissions
10sudo chown -R munge: /etc/munge/ /var/log/munge/ /var/lib/munge/ /run/munge/
11sudo chmod 0700 /etc/munge/ /var/log/munge/ /var/lib/munge/
12sudo chmod 0755 /run/munge/
13sudo chmod 0700 /etc/munge/munge.key
14sudo chown -R munge: /etc/munge/munge.key
15
16# Restart munge service and configure to run at startup
17# This will ask for auth per certain identity and login auth/psw
18systemctl enable munge
19systemctl restart munge
20
21# You can investigate munge service error with
22# systemctl status munge OR
23# sudo nano /var/log/munge/munged.log
Later on, we will be copying the MUNGE key over to the compute nodes.
- Installation
Download the files and actually build them. You can download the tarball here: https://www.schedmd.com/download-slurm/
 1#Install basic Debian package build requirements:
 2apt-get install build-essential fakeroot devscripts equivs
 3#Unpack the distributed tarball:
 4tar -xaf slurm*tar.bz2
 5#cd to the directory containing the Slurm source
 6#Install the Slurm package dependencies:
 7mk-build-deps -i debian/control
 8#Build the Slurm packages:
 9debuild -b -uc -us
10
11# Once done, go to the folder containing the deb files and install
12# Example
13apt install slurm-smd_23.11.4-1_amd64.deb
14apt install slurm-smd-client_23.11.4-1_amd64.deb
15# You can find which node needs what here: https://slurm.schedmd.com/quickstart_admin.html#debuild
16
- Configuration
SLURM uses a slurm.conf file to specify all required configurations to run your cluster. This file will be shared with all the nodes, and must be kept updated whenever a new node is added or new features added.
SLURM has a web configuration file generator located here: https://slurm.schedmd.com/configurator.html
You don't have to fill out all of the fields in the configuration tool since a lot of them can be left to their defaults. The following fields are the once we had to manually configure:
- ClusterName:
<YOUR-CLUSTER-NAME> - SlurmctldHost:
<CONTROLLER-NODE-NAME> - NodeName:
<WORKER-NODE-NAME>[1-4] (this would mean that you have four worker nodes called<WORKER-NODE-NAME>1,<WORKER-NODE-NAME>2,<WORKER-NODE-NAME>3,<WORKER-NODE-NAME>4) - Enter values for CPUs, Sockets, CoresPerSocket, and ThreadsPerCore according to $ lscpu (run on a worker node computer)
- ProctrackType: LinuxProc
Once you press the submit button at the bottom of the configuration tool your config file text will appear in your browser. Copy this text into a new /etc/slurm/slurm.conf file and save
Note
- At this point you should copy the conf file to your workers as well. You should use scp if you’re working with remote machines
1scp username@CONTROLLER-HOSTNAME:/etc/slurm/slurm.comf username@WORKER-HOSTNAME:/etc/slurm/slurm.conf
-
If your cluster requires the use of GPUs (as most HPC clusters will), you will need another configuration file to tell SLURM where the device files are. In this example, we will be assuming that we’re using NVIDIA GPUs and that we have
nvidia-smiinstalled. -
At the end of the slurm.conf file, you need to change the configuration in 2 places.
- Under NodeName = …. Add Gres=gpu:NUMBER_OF_GPUS_IN_NODE
- Uncomment GresTypes and set to gpu
- Add gres.conf to your compute node so it can find the nvidia files
1# Find the nvidia files
2ls -l /dev/nvidia?
3
4# Add those as gres.conf to your compute node
5# The file must be in the same directory as slurm.conf
6AutoDetect=off
7Name=gpu File=/dev/nvidia0
8Name=gpu File=/dev/nvidia1 > gres.conf
You can also name your GPUs such as a100, or 5090, but that’s beyond the scope of this project. For now, let’s assume every user will be asking for a gpu name of gpu.
Now that should be enough for the control node. Next, let’s setup the compute nodes.
Setup the Compute Nodes
Startup
- Startup
Now start the slurm controller node systemctl and configure it to boot on startup
1systemctl enable slurmctd
2systemctl restart slurmctld
To check your SLURM installation
1systemct status slurmctld # returns status of the systemctl daemon
2sinfo # returns cluster information
You can also check the cluster is correctly setup by running
1srun -N <NUMBER-OF-NODES> hostname
Where is the number of worker nodes that are currently Setup. If everything goes well, this should return the name of all of your nodes.
Conclusion
Congratulations! You've successfully built a basic SLURM HPC cluster. You now have:
- A control node running
slurmctldto manage your cluster - Compute nodes ready to execute jobs
- Shared filesystem for data access across nodes
- GPU support configured via gres.conf
- Authentication via MUNGE
This foundational setup is just the beginning. In production environments, you'll want to add:
- Job accounting - Track resource usage and job history
- REST API access - Enable programmatic job submission
- Advanced scheduling - Configure fair-share, QOS, and resource limits
- Monitoring - Set up dashboards for cluster health and utilization
- Backups - Protect configuration files and databases
What's Next?
This is Part 1 of a series on building and managing HPC clusters. Continue with:
- Part 2: Setting Up SLURM Database (slurmdbd) - Add job accounting and usage tracking
- Part 3: Setting Up SLURM REST API (slurmrestd) - Enable programmatic access to your cluster
If you're considering building an HPC cluster for your team, I hope this guide gives you a solid starting point. Good luck!